If you're willing and ready to learn the art of transcription, this guide will walk you through how to write a transcript from scratch.

If you’ve never transcribed audio or video content, you might think it’s as simple as “listen and type.” But we’re about to let you in on an industry secret—knowing how to write a transcript requires time, stamina, and incredible attention to detail.
So if you’re willing and ready to learn the art of transcription, this guide will walk you through how to make a transcript from scratch. From finding the right tools to acing the transcript formatting, here’s everything you need to know about writing transcripts.
Benefits of a Well-Crafted Transcription
When transcriptions are written with patience and meticulous attention to detail, they can serve a number of helpful purposes. Here are some of the benefits of creating a first-rate transcript.
Transcripts improve clarity.
A well-crafted transcript can help refine the meaning of the audio or video content for you and your audience. Whether it’s an interview with multiple speakers or a dictation with specific instructions to the typist, seasoned transcribers learn to listen carefully to every word. They may leave out meaningless filler words like “um” and “ah.”
They save tons of time.
Writing your own transcript might not save you any time, but it will definitely help others find the information they need more efficiently. Since people can read much faster than they can listen, having a transcript on hand to reference as needed makes finding essential information effortless.
If the transcription is digital, you can even use search and find to pinpoint words and phrases with impressive efficiency.
Transcripts help search engines index audio and video content.
Search engine crawlers have a difficult time indexing audio and video content. However, a transcript can be a powerful tool in helping you reach a wider audience and improve your search engine optimization (SEO).
It makes your content more accessible.
Transcripts can make your content accessible to people with hearing impairments or people who speak a different language. They can also be helpful for people who prefer to consume your content as written transcription.
Choosing Your Transcription Type
There are several different kinds of transcriptions, each one with its own benefits. Before you dive into your transcription project, you have to decide which one of these transcript types suits your needs best.
Edited Transcription
An edited transcript is a polished version of the original recording. Edited transcripts are easy to read and do not include any filler words, false starts, or other errors. This type of transcription can be helpful for legal briefs, letters, memos, and other professional communication documents.
Verbatim Transcription
Verbatim transcription is the opposite of edited transcription. A verbatim transcript includes everything said in the original recording, including filler words, false starts, and grammatical errors. This type of transcription is helpful for interviews, interrogations, and other situations where a word-for-word detailed record is necessary.
Intelligent Transcription
In an intelligent transcript, the main idea triumphs over the words themselves. The transcriptionist paraphrases what was said and condenses any superfluous information. This type of transcription is valuable when creating meeting notes, medical transcriptions, or business presentations.
How To Write a Transcription in 5 Steps
Once you’ve picked a transcription type that’s appropriate for your needs, it’s time to get down to the nitty-gritty of how to write a transcript. Follow these five steps to transcribe your content like a pro.
1. Prepare your space, tools, and equipment.
To transcribe your content, start by making sure you have the materials and setup conducive to quality transcription. Start by obtaining a high-quality recording of the audio or video you want to transcribe. The better the audio quality, the easier it is to write a transcript, so invest in top-grade equipment to record your audio if you can.
Next, you’ll need a good pair of headphones to listen to the audio. If you’re unable to find a quiet space to write your transcript, consider opting for noise-canceling headphones to help reduce distractions.
You’ll also need a text editor or word processing program to type out your transcript. If you really want to save time, make sure you’ve got transcription software (such as a speech to text app or A.I. software) on hand as well. No need to waste time researching your options—we already broke down the best transcription software options here.
When setting up your desk, double check that you don’t have to strain your neck to see the computer. Ergonomic chairs and keyboards can help with minimizing straining.
Finally, consider investing in a transcription foot pedal if you plan to transcribe often. The pedal will let you control the playback of your recording with your feet, leaving your hands free to type as you listen.
2. Listen to the recording in full before you type.
Before you start transcribing words, you should listen to the entire recording from start to finish and take notes on some key details. You should note the following information on your first listen:
- If you’re creating an interrogation, meeting, or interview transcription, how many speakers are there?
- If there are multiple speakers, are the voices distinguishable from one another?
- Are there any tricky sections of audio?
- Does the speaker dictate any instructions for the typist?
3. Write a rough draft.
Finally, the moment you’ve been waiting for—it’s time to start transcribing your audio or video to text. Begin by typing out a rough draft of the audio, including any difficult words or passages you noted while listening for the first time. If you still can’t understand what’s being said, make a note to return to that part later and move on.
Don’t worry about spelling mistakes or getting everything perfect at this stage—you can clean up your transcript later. Use a shorthand for words that occur frequently (like names) and stop to rewind as often as you need. The important thing is to get all the information down in writing—you can edit it to perfection later.
4. Proofread and edit the transcript.
Once you have a complete transcription draft, it’s time to proofread and edit your work. Start by reading over the entire transcript from start to finish as you listen to the recording once more.
Be on the lookout for these common first-draft errors as you listen:
- Missed words or phrases
- Capitalization and punctuation errors
- Shorthand abbreviations that need to be spelled out
- Misformatted or missing numbers, dates, or currency symbols
- If doing edited or intelligent transcription, this is the time to correct grammar, syntax, and clarity mistakes.
Grammarly is an excellent tool to help you with this process if you want help speeding things along.
5. Format the transcript.
The next step is to format your transcript so it’s professional and easy to read. We’ll go into more detail about what this could look like in the next section, but generally this could mean:
- Adding in timestamps
- Labeling speakers
- Manually setting margins and spacing
- Including proper headers
- Correcting spelling or grammar errors
If you need help formatting your transcript, check out these free transcription examples with templates to get started.
Finally, export your transcript to the desired file type, such as a PDF, Word document, or text file.
Good vs. Bad Transcript Examples
As you’ve undoubtedly learned by now, there’s more to transcription than simply listening to audio and typing what you hear. The difference between a professional transcription and an amateur one comes down to the details. Here are two popular transcript types that exemplify the need to pay close attention to detail.
Legal Brief
A legal brief is a common type of transcript used by legal professionals to detail why a party believes their case will prevail. Any errors in the transcript could lead to serious misunderstandings, which is why it’s so important to get these transcriptions right.
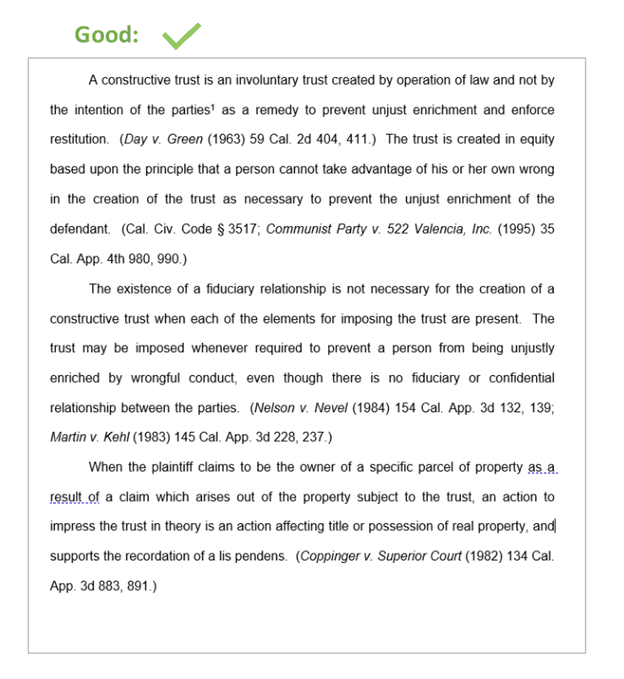
This is an example of a well-formatted, professional legal brief transcript:

The quality of this legal brief transcript is professional-grade—it needs no editing before submitting it to other legal professionals. Here’s why:
- It’s double spaced.
- It uses the section symbol (§) instead of writing out the word “section.”
- It italicizes case names in case citations and abbreviates versus as “v.”
- It uses proper case citation format, including appropriate abbreviations.
- The typist inserted actual footnotes when requested.
- It uses consistent capitalization, especially in case citations.
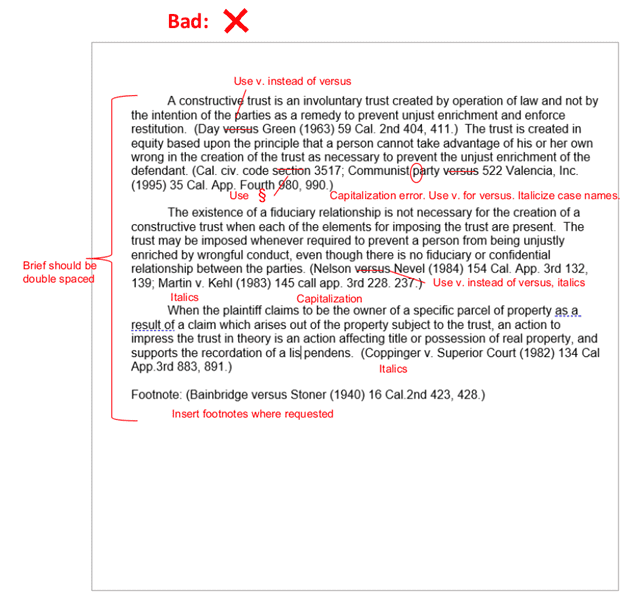
Without attending to these details, the legal transcript is much more challenging to read and could contain unprofessional errors. This is the same letter, but without the professional polish.

To the untrained eye, this transcription may seem ready to use. But a seasoned pro will immediately recognize that it needs additional editing. Here’s why:
- It spells out words that are traditionally abbreviated or replaced with symbols.
- It’s not double-spaced, making it difficult to read quickly.
- It includes distracting capitalization errors.
- It doesn’t insert the footnotes as requested but spells out the request for a footnote verbatim.
- It doesn’t follow the industry standard of italicizing case names.
Legal Letter
A legal letter is often dictated by legal professionals and then transcribed before being sent to clients or other legal professionals. When it comes to a legal letter transcript, the goal is to create a professionally formatted document with close attention to detail.
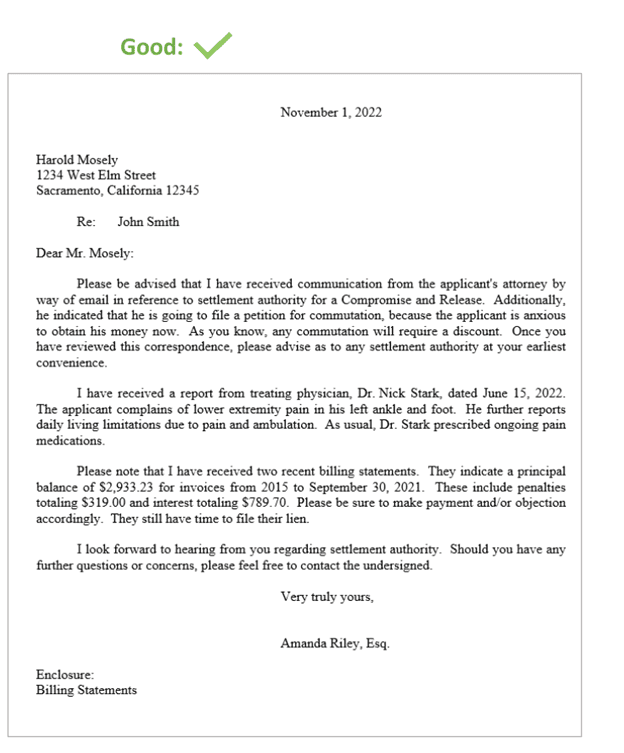
Here’s an example of a well-formatted, high-quality legal letter:

This legal letter is high quality because it:
- Includes properly formatted letter elements, such as the date, re: line, and enclosure line
- Uses appropriate punctuation
- Uses consistent indentation style
- Uses proper grammar (principle/principal, lean/lien)
- Corrects the speaker’s slang pronunciations (client says “gonna,” transcriptionist types “going to”)
- Uses provided spelling, do not type out verbatim (S-T-A-R-K)
- Formats dates appropriately: Do not use ordinals (e.g., September 30th should be typed September 30)
- Formats dollar amounts properly (do not type out “dollars”)
- Leaves room for a signature in the signature block
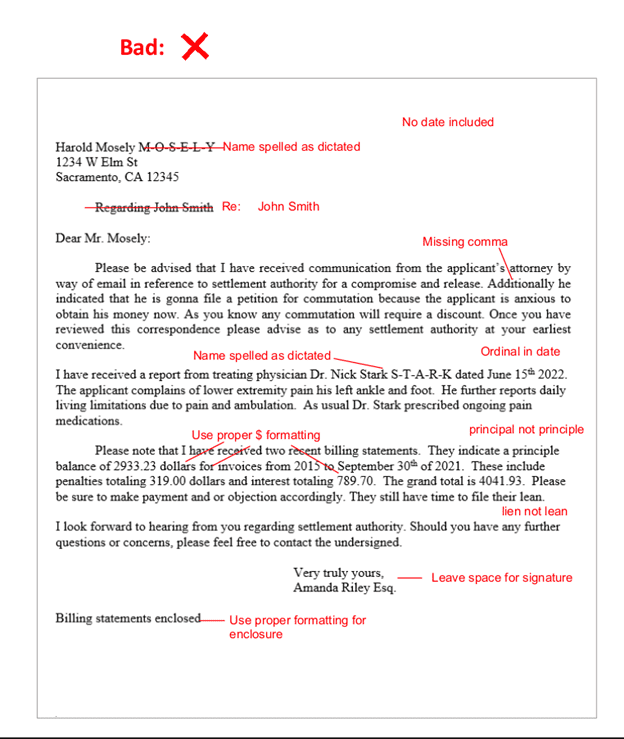
Without attention to detail, your letter transcription may turn out looking like this:

This legal letter transcript is riddled with small yet highly unprofessional errors. Some of these errors include:
- Incorrect formatting that doesn’t follow the industry standard
- No space for a traditional signature
- Distracting spelling errors
- Doesn’t follow instructions for the typist, spells out names verbatim instead
- No date is included, creating confusion in an industry that revolves around critical deadlines
- Missing punctuation errors disrupt the clarity
Don’t let all your hard transcription work go to waste because you don’t double check the details—be sure to edit your transcript with a fine tooth comb.
Hacks for Writing a Transcript Quickly
It’s no secret that self-transcription can be a grueling process—especially if you’re new to it. If you’re looking for ways to improve your transcriptions or make the process go faster, here are a few transcription hacks to help speed up the process.
Ensure your audio is high quality.
Wrestling with problematic audio is no fun—especially if you’re using a speech-to-text or A.I. transcription software to help you do the job. Difficult audio means more editing for you on the back end, so take measures to produce the best audio quality possible. Use a high-quality recording device and avoid recording in noisy environments.
Use transcription software with foot pedal support.
A foot pedal is a physical pedal you can press with your foot to control the playback of your audio file—without having to take your hands off the keyboard. This comes in handy when you’re transcribing extended audio or trying to jot down notes quickly.
Take advantage of keyboard shortcuts.
Most transcription software comes loaded with helpful keyboard shortcuts to help you speed up the process. When starting out, take some time to learn the most commonly used shortcuts. This will save you tons of time in the long run.
Transcribe in short bursts.
Listening to long stretches of audio can be taxing on your ears and brain. So try to transcribe in short, 20-30 minute intervals to stay fresh. Be sure to take breaks, get up, and move around every so often to keep your energy levels up.
Hire a professional transcriptionist.
If you don’t have the time or energy to transcribe your own audio, consider hiring a professional transcriptionist to do it for you. Professional transcription services offer convenient transcript features and are a surprisingly affordable option. Plus, using these services can free up lots of time for you to focus on other tasks [more on how transcription services work here].
Save Time and Money With Fast Transcription Services
If you’re looking for a fast, affordable transcription service, look no further than SpeakWrite. We offer high-quality, 100% human transcriptions that are accurate, professionally formatted, and ready to use upon delivery. Check out how much time and money you could save with our Time and Cost Savings Calculator, and get started today with a free trial of our transcription services.


